

An infrared sensor is an electronic device that emits in order to sense some aspects of the surroundings. An IR sensor can measure the heat of an object as well as detects the motion.
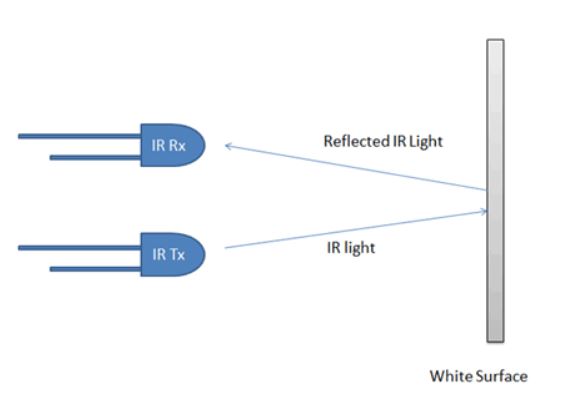
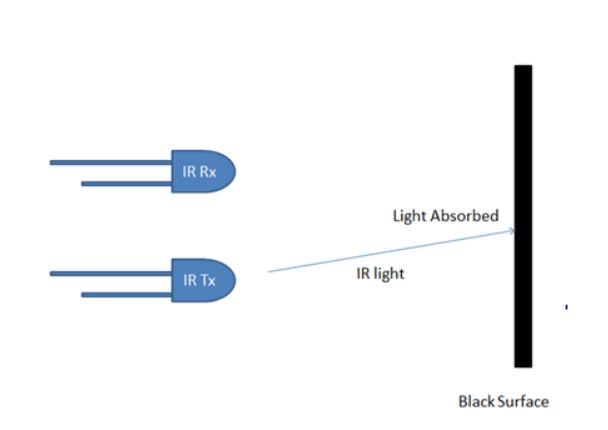
IR Sensor or Infrared Sensor has two main parts. IR Transmitter and IR Reciever. The work of IR transmitter or Infrared transmitter is to transmit the infrared waves whereas the work of IR receiver is to receive these infrared waves. IR receiver constantly sends digital data in the form of 0 or 1 to Vout pin of the sensor. If there is an object in front of IR sensor, the transmitted infrared waves from IR transmitter reflects from that object and is received by the IR receiver. IR sensor gives 0 or LOW in this condition. Whereas, if there is no object in front of the IR sensor, the transmitted infrared waves from IR transmitter is not received by the IR receiver. And IR sensor gives 1 or HIGH in this condition.
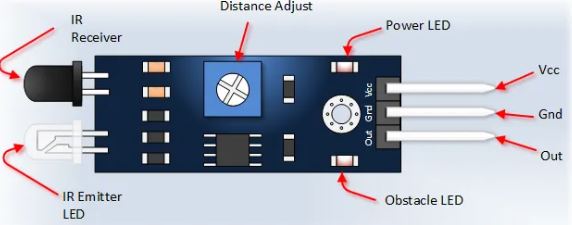
Pin Out of IR sensor

Arduino Interfacing of IR sensor
Consider a circuit connection of IR sensor with arduino as shown in circuit below:

Arduino Code
// IR sensor Module with arduino
// ENGG HOME
//https://engghome1.wordpress.com/
int LED = 13; //onboard Uno LED
int ObstaclePin = 7;  // input pin
int Obstacle = HIGH;  // NO OBSTACLE
void setup() {
  pinMode(LED, OUTPUT);
  pinMode(ObstaclePin, INPUT);
  Serial.begin(9600);

}
void loop() {
  Obstacle = digitalRead(ObstaclePin);
  if (Obstacle == LOW)
  {
    Serial.println("OBSTACLE DETECTED,BE CAREFUL!!");
    digitalWrite(LED, HIGH);
  }
  else
  {
    Serial.println("NO OBSTACLE DETECTED, SAFE");
    digitalWrite(LED, LOW);
  }
  delay(100);
}
In the above program , if obstacle is detected then builtin LED of arduino glows and prints message otherwise LED turns off showing clear message in serial monitor.
Hope you understood the Basics of IR Sensor and its interfacing with Arduino . Thanks for your time in reading our post and do not hesitate in sharing this post to your friends and collegues.
Keep Reading, Keep Learning
CHEERS!!
Regards,
Credits: etechnophiles.com, GOOGLE,henrysbench.capnfatz.com, http://www.maxbotix.com
